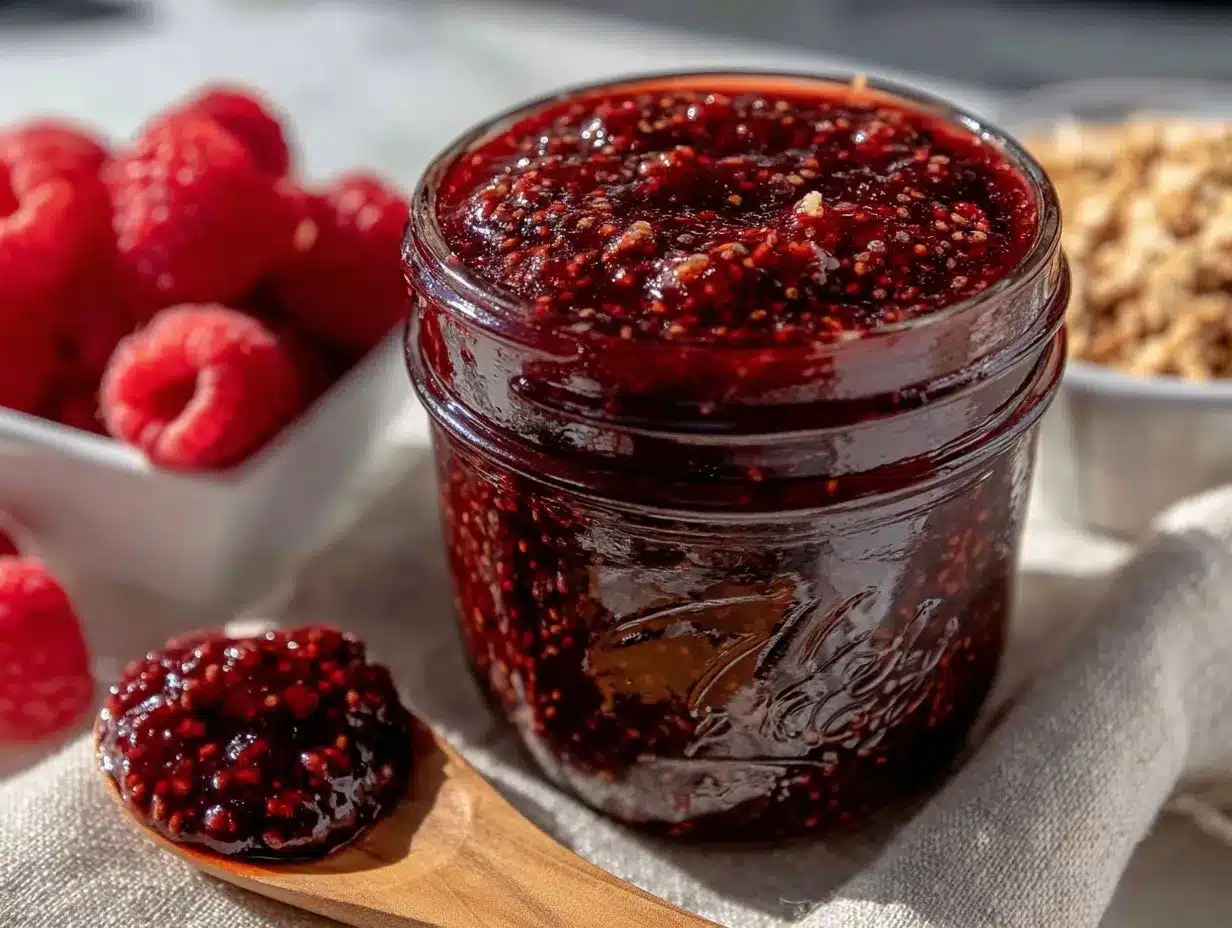
The taste of freshly made raspberry chia jam is like a burst of summer sunshine captured in a jar. Imagine drizzling it over warm toast, swirling it into creamy yogurt, or spooning it onto pancakes for a morning treat. Honestly, this recipe has been a game-changer in my kitchen, and the best part? It’s ready in just 10 minutes! No boiling jars, no fancy equipment, and no long hours of stirring over a bubbling pot. It’s simple, healthy, and absolutely delicious.
I discovered this recipe during a busy week when I wanted something homemade but didn’t have hours to spare. The combination of raspberries and chia seeds creates a perfectly thick and luscious jam without the need for added pectin or loads of sugar—and it’s packed with health benefits too! If you’ve been looking for a quick way to make your own jam that’s both nutritious and easy, this fresh raspberry chia jam recipe is your answer.
Why You’ll Love This Recipe
- Quick & Easy: Ready in just 10 minutes, this recipe is perfect for those mornings when you want something homemade without the hassle.
- Healthy Ingredients: Made with fresh raspberries, chia seeds, and a touch of natural sweetener, it’s free from refined sugar and preservatives.
- Versatile: Use it as a spread, topping, or even mix it into your favorite smoothie or oatmeal.
- Kid-Friendly: Kids love the sweet, fruity flavor, and you’ll love that it’s packed with nutrients.
- No Special Equipment: All you need is a saucepan, a spoon, and a jar to store your homemade jam.
What makes this raspberry chia jam stand out is the magic of chia seeds. They naturally thicken the jam, giving it that perfect spreadable consistency without needing to add loads of sugar or artificial thickeners. And let’s be honest, raspberries are already delicious on their own—you’re just enhancing them with a touch of sweetness and texture. This is not your typical store-bought jam; it’s fresher, healthier, and so much tastier!
Plus, as someone who’s tried this recipe countless times, I can vouch for its foolproof nature. Whether you’re a seasoned cook or a total beginner, you’ll nail this recipe every time. It’s the kind of jam that makes you smile with every bite!
What Ingredients You Will Need
This fresh raspberry chia jam recipe is all about simplicity. You only need a handful of ingredients to create something truly special.
- Fresh raspberries: About 2 cups (250g). Fresh raspberries are ideal for this recipe, but frozen raspberries work beautifully too—just make sure they’re unsweetened.
- Chia seeds: 2 tablespoons. These tiny seeds are the secret to achieving a naturally thickened jam without any added pectin.
- Honey or maple syrup: 2-3 tablespoons, depending on your desired sweetness. You can also use agave or another liquid sweetener.
- Lemon juice: 1 tablespoon. Adds a lovely tang and helps balance the sweetness.
- Optional add-ins: Vanilla extract, cinnamon, or even a touch of orange zest for a flavor boost.
That’s it! Simple ingredients come together in the most magical way. I always recommend tasting your raspberries first. If they’re super sweet, you can cut down on the sweetener. If they’re a bit tart, feel free to add an extra drizzle of honey or maple syrup.
Equipment Needed
You don’t need fancy gadgets for this raspberry chia jam recipe. Here’s what you’ll need:
- Small saucepan: Perfect for cooking down the raspberries and creating the jam.
- Wooden spoon or silicone spatula: For stirring the mixture as it simmers.
- Measuring spoons: To ensure the right balance of chia seeds and sweetener.
- Glass jar or container: For storing your finished jam. Mason jars work wonderfully!
If you don’t have a saucepan, a small pot will work just as well. And if you don’t have a glass jar, any airtight container will do. I love reusing old jam jars for a more eco-friendly option!
Preparation Method
- Prepare the raspberries: Rinse the raspberries under cool water and gently pat them dry. If you’re using frozen raspberries, let them thaw slightly before starting.
- Cook the raspberries: Add the raspberries to a small saucepan and place it over medium heat. Stir occasionally until the raspberries begin to break down and release their juices, about 3-5 minutes.
- Sweeten the jam: Add the honey or maple syrup to the saucepan. Start with 2 tablespoons and taste as you go—add more if you prefer a sweeter jam.
- Add the lemon juice: Stir in the lemon juice to enhance the flavor and balance the sweetness. You’ll notice the jam becoming fragrant and bright.
- Incorporate the chia seeds: Reduce the heat to low and stir in the chia seeds. Mix well to ensure they’re evenly distributed. Let the jam simmer for 2-3 minutes, stirring constantly.
- Cool and thicken: Remove the saucepan from heat and let the jam cool for 5-10 minutes. As it cools, the chia seeds will absorb liquid and thicken the jam to a perfect consistency.
- Transfer to a jar: Once cooled, transfer the jam to a clean glass jar or airtight container. Store in the refrigerator for up to 2 weeks.
And there you have it—your very own homemade raspberry chia seed jam! If you like your jam super smooth, you can use an immersion blender to puree the mixture before cooling. Otherwise, keep it rustic with chunks of fresh raspberry for a more traditional texture.
Cooking Tips & Techniques
Making raspberry chia jam is simple, but here are a few tips to make it even better:
- Use ripe raspberries: The riper the raspberries, the sweeter and more flavorful your jam will be.
- Adjust sweetness: Always taste your jam during cooking to ensure it’s sweet enough for your liking. Everyone’s preference is different!
- Don’t skip the lemon juice: It might seem minor, but the acidity balances the flavors perfectly.
- Watch the heat: Cook the raspberries on medium heat to avoid burning and to help the juices release properly.
- Experiment with add-ins: A pinch of cinnamon or a splash of vanilla extract can take the flavor profile to the next level.
Trust me, after making this jam once, you’ll never go back to store-bought varieties. Plus, you get to control exactly what goes into it—no hidden additives or extra sugar here!
Variations & Adaptations
This raspberry chia jam recipe is incredibly versatile, and there are so many ways to make it your own:
- Berry blends: Mix raspberries with other berries like blueberries, strawberries, or blackberries for a unique twist.
- Sugar-free version: Skip the sweetener entirely if your berries are naturally sweet or use a sugar-free substitute like stevia or monk fruit.
- Citrus flair: Add orange zest or lime juice for a tangy twist.
- Spicy kick: Stir in a pinch of ground ginger or cayenne for a subtle heat.
- Different seeds: Experiment with flaxseeds or ground psyllium husk as an alternative thickener.
Personally, I love adding a bit of vanilla extract and cinnamon—it gives the jam a warm, cozy flavor that’s perfect for fall mornings.
Serving & Storage Suggestions
This raspberry chia jam is a delight to serve and store. Here are some tips to help you make the most of it:
- Serving ideas: Spread it on toast, stir it into oatmeal, drizzle it over pancakes, or use it as a topping for ice cream. It’s also great with cheese and crackers!
- Presentation tip: Serve the jam in mini jars at brunch gatherings—it’s cute and makes a great conversation starter.
- Storage instructions: Store the jam in an airtight container or glass jar in the refrigerator. It will keep for up to 2 weeks.
- Freezing option: You can freeze the jam in small portions for up to 3 months. Thaw overnight in the fridge before using.
- Reheating: Warm the jam slightly in the microwave or on the stovetop if desired, but it’s delicious straight from the fridge too.
Nutritional Information & Benefits
Here’s why this raspberry chia jam is a winner:
- Low in sugar: With minimal sweetener, this jam is a much healthier choice than traditional jams loaded with sugar.
- Packed with fiber: Chia seeds are a fantastic source of fiber, supporting digestion and helping you feel full longer.
- Rich in antioxidants: Raspberries are loaded with vitamins and antioxidants that support your immune system and skin health.
- Gluten-free and vegan: If you opt for maple syrup, this recipe is completely vegan and suitable for gluten-free diets.
Plus, this jam is free from preservatives, artificial colors, and flavors, making it a wholesome choice for you and your family.
Conclusion
If you’re looking for a quick, healthy, and delicious recipe to brighten up your mornings, this fresh raspberry chia jam is perfect. It’s customizable, nutritious, and so easy to make that you’ll wonder why you ever bought store-bought jam. For me, the joy of making this recipe is in the simplicity—and the unbeatable taste of fresh raspberries.
I hope you love this recipe as much as I do! Try it out, experiment with flavors, and share your creations with me. Leave a comment below and let me know how you enjoyed it, or tag me on social media so I can see your beautiful jams!
Remember, the best recipes are the ones that bring joy to your kitchen and your table. Here’s to sweet mornings and happy taste buds!
FAQs
Can I use frozen raspberries?
Yes! Frozen raspberries work just as well as fresh ones for this recipe. Let them thaw slightly before cooking.
How long does the jam last?
This jam will stay fresh for up to 2 weeks in the refrigerator when stored in an airtight container.
Can I make this jam sugar-free?
Absolutely! Simply leave out the sweetener or use a sugar-free option like stevia or monk fruit.
Can I use other fruits?
Yes, you can! Try strawberries, blueberries, blackberries, or even peaches for a fun twist.
What’s the best way to enjoy this jam?
It’s amazing on toast, pancakes, yogurt, oatmeal, or even in smoothies. You can also pair it with cheese and crackers for a savory-sweet snack!
Pin This Recipe!


Fresh Healthy Raspberry Chia Jam Recipe You Can Make in 10 Minutes
- Total Time: 10 minutes
- Yield: 1 jar (approximately 1 cup) 1x
Description
This quick and easy raspberry chia jam is packed with nutrients, free from refined sugar, and ready in just 10 minutes. Perfect for spreading on toast, mixing into yogurt, or topping pancakes.
Ingredients
- 2 cups (250g) fresh raspberries (or unsweetened frozen raspberries)
- 2 tablespoons chia seeds
- 2–3 tablespoons honey or maple syrup
- 1 tablespoon lemon juice
- Optional: vanilla extract, cinnamon, or orange zest
Instructions
- Rinse the raspberries under cool water and gently pat them dry. If using frozen raspberries, let them thaw slightly before starting.
- Add the raspberries to a small saucepan and place it over medium heat. Stir occasionally until the raspberries begin to break down and release their juices, about 3-5 minutes.
- Add the honey or maple syrup to the saucepan. Start with 2 tablespoons and taste as you go—add more if you prefer a sweeter jam.
- Stir in the lemon juice to enhance the flavor and balance the sweetness.
- Reduce the heat to low and stir in the chia seeds. Mix well to ensure they’re evenly distributed. Let the jam simmer for 2-3 minutes, stirring constantly.
- Remove the saucepan from heat and let the jam cool for 5-10 minutes. As it cools, the chia seeds will absorb liquid and thicken the jam to a perfect consistency.
- Once cooled, transfer the jam to a clean glass jar or airtight container. Store in the refrigerator for up to 2 weeks.
Notes
[‘Use ripe raspberries for the best flavor.’, ‘Taste the jam during cooking to adjust sweetness to your preference.’, ‘Don’t skip the lemon juice—it balances the flavors perfectly.’, ‘Experiment with add-ins like cinnamon or vanilla extract for extra flavor.’]
- Prep Time: 5 minutes
- Cook Time: 5 minutes
- Category: Condiment
- Cuisine: American
Nutrition
- Serving Size: 1 tablespoon
- Calories: 20
- Sugar: 2
- Fat: 0.5
- Carbohydrates: 4
- Fiber: 1.5
- Protein: 0.5
Keywords: raspberry jam, chia jam, healthy jam, quick jam, homemade jam, sugar-free jam, vegan jam, gluten-free jam